Visualizing geographical information associated with photos can be made more efficient using our Converter. It allows you to transform files containing images – either geotagged or with coordinates provided separately in an accompanying table (CSV or XLSX) directly into a KMZ file. The table can include latitude, longitude, placemark label and additional attributes such as description, timestamp, or any other relevant metadata. This KMZ format, commonly used in Google Earth, is ideal for storing and sharing spatial data in a compact and easy-to-use format.
Such a tool is highly useful for various applications, such as documenting field surveys, archiving construction site progress, presenting your travel journeys, or even mapping environmental changes over time. By converting your data into KMZ, you can create rich visual presentations, display your photos directly in Google Earth, and convey complex spatial information in an intuitive format, making it ideal for research, travel storytelling, analysis, and effective communication. This article will guide you on how to correctly prepare and convert your photos and tabular data into a KMZ format.
How to Format CSV/XLSX Data
Your data should contain at least four columns: Latitude (lat), Longitude (lon), Placemark Label, and Photo Name. The names of these attributes can be customized by the user, as long as they correspond to the attributes described above.
The lat and lon columns represent the geographic coordinates of each location. The Placemark Label column is used to uniquely identify each point on the map, while the Photo Name column should include either the file name of the image (if stored in the same folder as the CSV/XLSX) or the full path to the image file. If the photos are stored in a subfolder, use the relative path to the image.
These attributes ensure that your photos are correctly linked to each location on the map, allowing for enhanced visualization in the resulting KMZ file. Additional attribute data, such as description, date, or other metadata, can be added in separate columns to provide more context and information about each point. It is possible to associate more than one photo with a single location. In such cases, separate the photo names with commas – see this example (the images are stored in the subfolder in this example):

The most common way to prepare or edit your data is by using a spreadsheet tool, such as MS Excel, LibreOffice, Google Sheets, or a similar program. The data can then be saved in formats like XLSX or CSV. A sample CSV file could look like this (the photos are stored in the same directory as the CSV):

How to Format CSV/XLXS for Geotagged Photos
Geotagged photos are images that have location information (such as latitude and longitude) embedded within the photo file. This means that, along with the image itself, details about where the picture was taken are recorded. On most smartphones, this feature is often enabled by default, so every time you take a picture, the device automatically saves its location. This makes it easy to organize your photos by place and view them on a map, which is especially useful for travel photography, documenting trips, or creating visual maps of your experiences.
To determine if a photo is geotagged on different operating systems, follow these steps:
Windows
- Right-click on the photo file and select Properties.
- Go to the Details tab.
- Scroll down to find GPS information. If fields like Latitude and Longitude have values, the photo is geotagged.
macOS
- Open the photo in Preview.
- Go to Tools in the menu and select Show Inspector.
- Click on the i (Information) icon and switch to the GPS tab. If coordinates are displayed, the photo is geotagged.
If you are using geotagged photos, you don’t need to include separate Latitude (lat) and Longitude (lon) columns in your XLSX or CSV file. Instead, the geographic coordinates are already embedded in the images themselves. You only need to include the Placemark Label column to identify each point on the map and the Photo Name column, which should contain the file name of the image (or its relative path if stored in a subfolder). The names of these attributes can be customized by the user, as long as they correspond to the attributes described above.
Example of an XLSX file structure for geotagged photos and images stored in the same folder:

Conversion to KMZ File
To convert your data into KMZ, use the MyGeodata Converter and upload your prepared data (photos and CSV/XLSX file).
If your photos and CSV/XLSX file are in the same directory, you can upload the data by selecting all files. However, we recommend packaging everything into a ZIP file. A ZIP file is mandatory if the photos are stored in a subfolder.
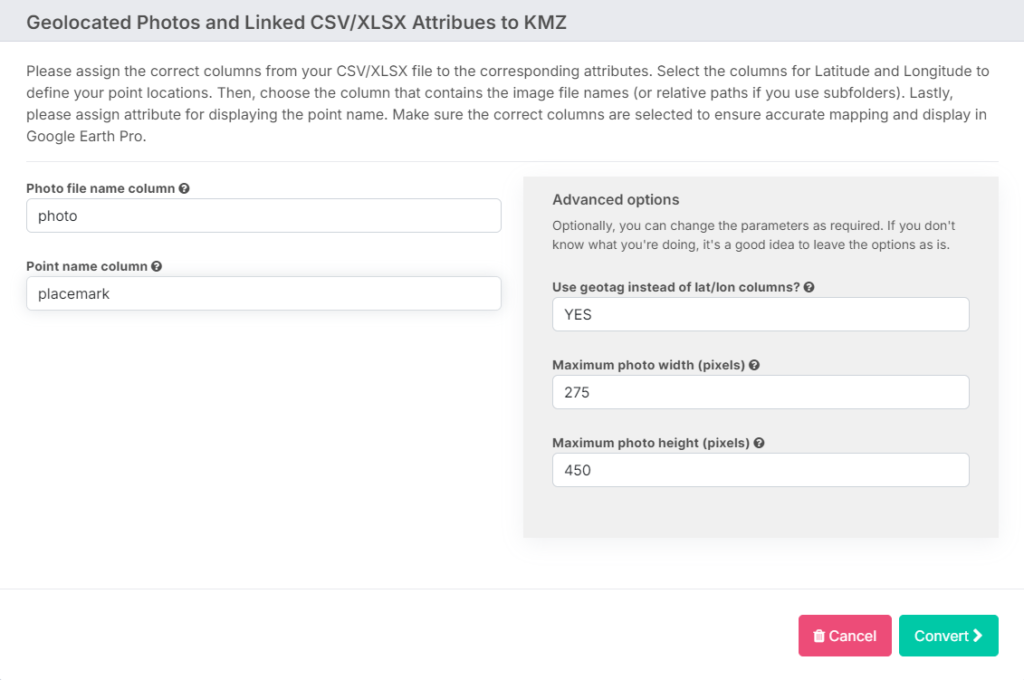
If the coordinate information for your photos is stored in a separate XLSX or CSV file, start by selecting the columns for latitude and longitude to define the point locations (lat and lon columns). Then, choose the column that contains the image file names (Photo name column). Finally, assign the attribute for displaying the point name (Placemark label column). Make sure that the correct columns are selected to ensure accurate mapping and visualization in Google Earth Pro.

For geotagged photos, there is no need to set columns for longitude and latitude. Simply go to Advanced Options and set the option Use geotag instead of lat/lon columns to YES.
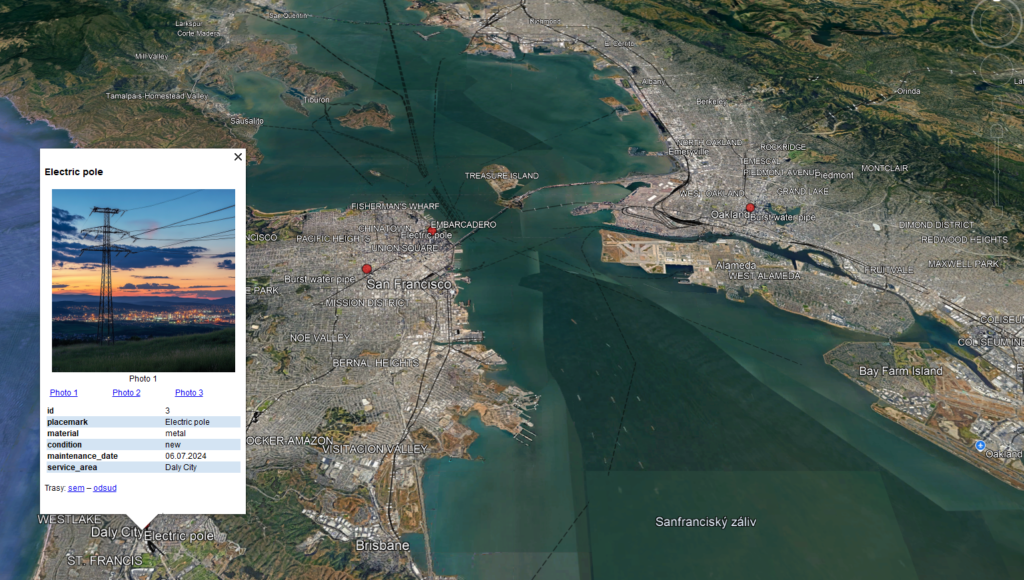
After the conversion is successfully completed, a ZIP file containing the KMZ will be available for download, which you can open in Google Earth. The example below shows the result of the conversion with a point that contained three photos and additional attributes. In the popup window, you can switch between the individual photos.
API
The above conversion can also be done using the API in addition to the web environment. The endpoint URL for the API call is the same as for the regular conversion using Converter (see. MyGeodata Converter API Doc) – that is: https://api.mygeodata.cloud/v1/convert. However, the parameters are partially different.
There is no need to specify these parameters:
- format – the parameter is not used – the output is always in KMZ format
- out_crs – KMZ format always uses the WGS 84 coordinate system and therefore there is no need to enter this parameter
- in_crs – if the coordinates of a point are not taken from the geotag of individual photos, then it is always required that the coordinates in latitude and longitude are in decimal format in the associated CSV/XLSX file. Therefore, the in_crs parameter is ignored.
- data_type – for this tool, the parameter is irrelevant and therefore ignored.
On the other hand, the following additional parameters must be specified:
| Parameter | Description |
|---|---|
| photo | the name of the column in the input CSV/XLSX file that contains the name or path to the photo (or multiple names separated by a comma) |
| label | the name of the column in the input CSV/XLSX file that contains the naming of this point, as displayed in Google Earth |
| lat | the name of the column in the input CSV/XLSX file that contains the latitude coordinate |
| lon | the name of the column in the input CSV/XLSX file that contains the longitude coordinate |
| geotag | if set to geotag=1 and the associated photos contain GPS coordinates in the EXIF metadata, it is not necessary to define the lat and lon parameters – the coordinates are taken from these photos. If a record has multiple photos in the CSV/XLSX table, then the coordinates for the resulting point are averaged |
| width | (optional) the maximum desired width of the displayed photo in the Google Earth popup window. The value is specified in pixels. The default value is 275. |
| height | (optional) the maximum desired height of the displayed photo in the Google Earth popup window. The value is specified in pixels. The default value is 450. |
The meaning of the other parameters (force_zip, output) and the way the input files are sent remain the same as specified in the API Doc. Please keep in mind, if you have your input data in subdirectories, you need to pack this data into a ZIP file – otherwise the subdirectories cannot be uploaded in any other way.
Examples of the API call:
curl -H "Content-Type: multipart/form-data" -X POST -F 'api_key=API_KEY' -F 'photo=filename' -F 'label=Customer' -F 'lat=Latitude' -F 'lon=Longitude' -F "file1=@/path/data.zip" --output result.kmz https://api.mygeodata.cloud/v1/convert
curl -H "Content-Type: multipart/form-data" -X POST -F 'api_key=API_KEY' -F 'photo=filename' -F 'label=Name' -F 'geotag=1' -F 'force_zip=1' -F "file1=@/path/data.zip" --output result.zip https://api.mygeodata.cloud/v1/convert
Example data
This dataset contains training data with geotagged photographs – dataset download.
This dataset contains training data with photographs and coordinates recorded in an XLSX file – dataset download.
For a complete introduction on how to get started, check out our Getting Started with MyGeodata Converter guide.
Curious about how to extract and view your visited locations from Google’s Location History? Check out our step-by-step guide here.